 |
Event Printer Mitsubishi SMART D90EV #Hashtag printing | |||
|
|
SMART D90EV is the new Mitsubishi concept, called SMART = CLEVER printer with its own computer and program Its destination is any event where are more people - parties, weddings, congresses, sporting events, discos .... The printer is equipped with WIFI, so the photographer can print photos by sending them directly from camera to printer, but whatīs revolutionary = all participants can send their pictures / selfies directly from their smartphones to the printer to be involved in general entertainment - without internet access ! Mitsubishi has prepared attractive applications for smartphones ( web app - no need to install on your phone ) EASYPRINT - the easiest way to send pictures to printer FUNPRINT - you can insert your pictures to various templates, to add cliparts ( hearts, smilies etc) to make it even fun for the youth .... If you upload images to social network Twitter / Instagram and you mark them with the same # Hashatg, the printer can find and print them automatically, even more fun at your events ! SMART D90EV is built on the CP-D90DW(-P) printer, print sizes 10x15, 13x18, 15x15, 15x20, 15x23cm but also book strips paper thickness 0,21mm or 0,23mm, plus postcard or perforated paper Direct WIFI printing : * FTP ( profi cameras ) * Network hotfolders SAMBA * Hotspot HTTP browser - Web APP FUNPRINT and EASYPRINT * Mitsubishi APPs for iPhone / Android ( free download ) * # Hashtag app ( under licence - trial version for 14 days ) |
|
||
|
E-shop
|
||||
|
Mitsubishi Electric Changes for the Better - Mitsubishi Electric Changes for the Better - Mitsubishi Electric Changes for the Better - Mitsubishi Electric Changes for the Better - Mitsubishi Electric |
||||
|
|
||||
| #HASHTAG Printing ... see how simpla and fast it is | ||||
|
|
||||
|
Upload images to social networks including #Hashtag ( Hashtag is the keyword Mitsubishi printer can search for. Hahtag is all you write after character # / Hash .. for example #nameofyourevent, in our example we have used Hashtag = #testliberek Mitsubishi Smart D90EV .... just 4 steps Select the image Open Twitter type your Hashtag into line( #testliberek) and press Tweet = done  Your event photo is uploaded to Twitter, but it is simulataneously and automatically printed on the printer. We have prepared at Hashtag app configuration ( explained later ) logo, which is automatically inserted to the image ( our example - orange logo test liberek ). 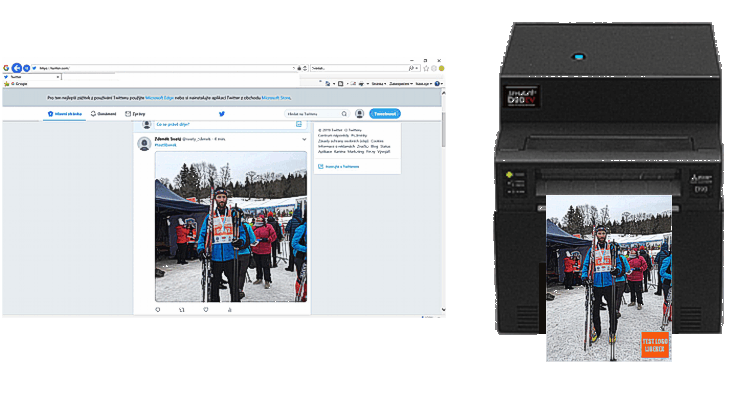 If you are planning some events - you can upload images to Twitter / Instagram and print them ... including all attandees if you tell them specific Hastag for this event - the printer will search for all images marked with this Hashtag but now from the beginning, if you buy a printer ...
|
||||
|
|
||||
| Unpacking and assembly of SMART D90EV | ||||
|
|
||||
| VIDEO |
VIDEO_unpacking_assembly_printer |
|||
|
Delivery of SMART D 90EV |
Mitsubishi SMART 90EV
consists from ( see picture ) printer
Mitsubishi CP-D90DW
/ DW-P, mini PC Intel NUC, the paper tray, PC power adapter and stand
with print
quide " how to print photo from smartphone fastest way" Unpacking, assembling the printer with the computer is shown step by step on the instruction video - Video_unpacking_assembly_printer  |
|||
|
First prepare printer |
1/ GET READY PRINTER Switch ON the printer, install the paper - detailed description of the printer Mitsubishi CP-D90DW-P If everything had gone smoothly, the printer prints 3 x white paper = READY |
 |
||
|
Then prepare
whole
asembly |
2/ INSTALL MINI PC Install the Intel NUC computer on the printer, connect it to printer with USB cable, connect power adapter and turn on the computer with the button on the top panel ( blue LED lights up ). If everything has been successful, the printer prints 1 x "Get Started" print .. = READY ! |
 |
||
|
|
||||
|
DIRECT
PRINT FROM SMARTPHONE |
||||
|
There are 3 ways to
print photos on Smart D90EV from Smartphone EASYPRINT / FUNPRINT .... you do not need to install anything to your smartphone, just connect to WIFI nertwork of the printer SMART PHOTO PRINT APP .... mobile APP, free download for iPhone / Android
|
||||
| Print from Smartphone using EASYPRINT | ||||
|
|
||||
|
First printout |
THE EASYIEST WAY TO
PRINT FROM SMARTPHONE
Quick print guide is supplied with Smart D90EV showing the easiest way to print from Smartphone / EASYPRINT. You can place guide ( magnetic bottom ) on the printer during event to make it easy for all participants. Please insert into stand guide in your local language - you can print it on this printer, as it is format 15x20 Version : Translation CZ / CZE Translation GB / ENG Translation D / DEU Translation F / FRA Translation I / ITA Translation E / ESP Translation P / PRT Translation S / SWE |
 |
||
|
1 Connect to WIFI network ( Smart D90EV must be ON ) / Enter Smartphone menu - Settings switch ON WIFI choose network : PhotoPrint = in majority cases "Start app" starts automatically |
||||
|
|
 |
|||
|
2 ONLY in case, you do not see Start application, start the application manually ( 2 ways) Open http://photoprint.lan : In the browser ( for example Safari ) type http://photoprint.lan |
||||
|
|
 |
|||
|
or simply launch the application using QR Reader ( if you have it on your phone ) and read QR code that is on the stand / guide |
||||
|
|
 |
|||
| EASYPRINT |
3 EASYPRINT gets open Agree conditions select your language select photos from camera ( Take photo ) or library ? we choose from WhatsApp |
|||
|
|
 |
|||
|
select photos
you wish to print confirm
Order
.. and photos are already printed / DONE ( if you want you can select another photos ) |
||||
|
|
 |
|||
|
Unpacking of the printer up first printout is decribed in the following document Get_started_with_SmartPhotoPrinter.pdf EASY PRINT 1 versus EASY PRINT 2
EASY PRINT 1 -
Printing of the image starts immediately after one image is selected. If you
select images from a mobile phone gallery, where screen is very sensitive to
touch, you may may accidentally pick and print wrong picture instead of
viewing picture.
|
||||
|
|
||||
| Print from Smartphone using FUNPRINT | ||||
|
|
||||
|
|
If you are preparing
Event where are mainly young people, you have the option to set
FUNPRINT as
default application. It means that all participants after connecting to WIFI
printer will print using FUNPRINT instead of EASYPRINT. The key difference of this application against EASYPRINT is that photos can be inserted to pre-prepared templates ( collages, strip bookmarks, etc ) and in addition one can insert cliparts to any place, see following description. |
|||
|
The first step is similair to Easyprint, but in the second step you choose template to which you load single shots, furthemore with optional decoration by clipart |
||||
|
|
 |
|||
|
You can pastw Clipart (Stamp)
anywhere by tapping on the display, you can enlarge / reduce size of it, you
can delete it etc .. confirm by
SET,
you can set the number of
COPIES and
finally
Order
.. and photos are already printed / DONE |
||||
|
|
 |
|||
|
|
||||
| Print from Smartphone using SMART PHOTO PRINT APP | ||||
|
|
||||
 |
If you like WIFI
printing, you can download Mitsubishi application direct to your Smartphone Smart Photo Print App is free to download for both Android / Iphone. Download - following links : IPHONEs https://itunes.apple.com/app/kiosk-prints/id560637995?mt=8 GOOGLE PLAY APPLE STORE / ANDROIDs https://play.google.com/store/apps/details?id=com.iboomobile.mitsubishi&hl or use this QR Code : |
|||
|
|
 |
 |
||
|
Smart Photo Print App |
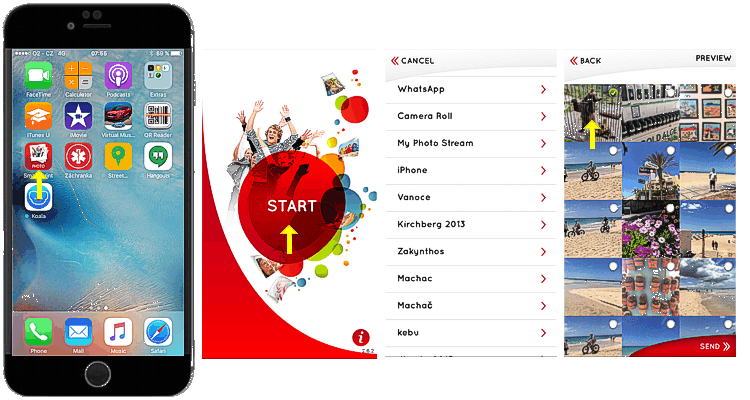
SMART PHOTO PRINT APP Connect to WIFI network Photoprint as described already at point 1 , then on you phone - Launch the Photo Smart print press button START select folder select photos to print |
|||
|
|
 |
|||
| choose format acc to installed paper in the printer, set number of copies and by pressing CONTINUE photos are sent to print --- | ||||
|
|
 |
|||
|
SMART PHOTO PRINT app is described ( even for Android ) in the following document Print from smartphone using smart_photo_print.pdf |
||||
|
|
||||
|
|
||||
| Customize your Event - EASYPRINT / FUNPRINT / PRINTER setting | ||||
|
|
||||
|
|
You can connect SMART D90EV through WIFI with your Smartphone, Ipad, your computer, which then serves as Control console of your Smart printer You can see into statistics, you see number of remaining copies at printer, you can set print size, print mode Matte x Glossy, print sharpness ..... and you can prepare the Event in advance = specific frames / text / logos which will decorate all printouts In the following we shall describe what is essential for event preparation. First you have to enter administration menu .... 1/ Connect to WIFI network Photoprint as allways 2/ Type link to your web browser ( if you control printer from iphone - Safari ) http://192.168.110.1/maintenance/admin User : admin Password : admin Save this link to your "favorites" to avoid typing of letters every time you prepare the event |
|||
|
|
If you enter administration
you see what is set for all who will print on the Smart D90EV They will send photos through EasyPrint (Easyprint2), all printer settings will follow Hotfolder (UserFolder_2) and photos will be printed on format 10x15cm, glossy finish. To change this setting - you need to stop program running at printerīs computer = press STOP SERVICE ( see picture ) You can change settings now, but no photos can be sent to the printer at this time, ie if you want to allow customers to print over FUNPRINT ( instead of EASYPRINT) during the Event, it is possible to change it within app 30sec, but take into consideration, that during setup printer doenst work. |

 |
||
|
|
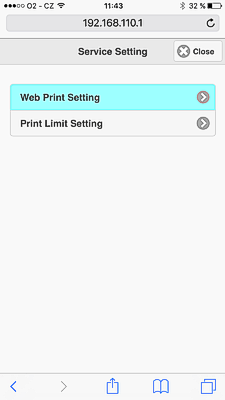
After stopping the service, open the TOP MENU where are 2 most important settings for Event preparation HOTFOLDER SETTING SERVICE SETTING Please press - SERVICE SETTING ( yellow arrow ) |

 |
||
|
|
Please press
WEB PRINT SETTING This is basic configuration where you set EASY PRINT 1/2 or FUN PRINT and you assign this application to concrete HOTFOLDER, where are printerīs specific settings ( print size etc ..) Press SET to memorize setting ( button SET is not visible on the picture because it is covered with expanded Easyprint x Funprint selection) |
 |
||
|
|
Press
HOTFOLDER SETTING,
at TOP MENU (
yellow arrow ) see picture above There are many hotfolders in this menu, which you can individually set and rename them to be it easier next time you assign them to EASY / FUNPRINT at web print setting. If you press for example 102, you see setting of User_Folder 2 : * Print Size * Quality - print speed - Auto x Fine x Ultrafine * Finishing Glossy x Matte * White border around photo ( yes / no ) * Portrait / landscape photo etc .... If you make the setting, re-name this folder ( first line) for example: Name : 10x15 landscape Analog way, you can name hotfolders you are going to use on your Events, for example 10x15 portrait, 15x20, Polaroid, Instagram etc |

 |
||
|
Hot folders are preset for each application as follows, so if you wish to change print size fast you can aesily to assign to service different hot folder : Hot folder 101 - 120 app EASY PRINT 101 - 10x15 portrait with frame, set validation of the order 102 - default / 10x15 portrait ( autorotation = both portrait and landscape images are printed correctly ) 104 - 15x20 landscape 106 - 13x18 landscape 110 - 15x8,9 portrait 111 - 10x15 portrait Hot folder 201 - 206 app FUN PRINT 201 - layout 1 202 - layout 2 203 - layout 3 204 - layout 4 205 - layout 5 206 - layout 6 FUNPRINT enables to choose from 6 templates. You can prepare specific layouts which fit to Event, however, name them by numbers 1.png 2.png ..... 6.png, only these 6 templates will be accepted by FUNPRINT program. Hot folder
300
app
SMART PRINT APP |
||||
|
|
||||
|
|
||||
| Customize your Event - EASYPRINT / FUNPRINT / PRINTER setting | ||||
|
|
||||
|
1/ Pøepare your specific frame - please follow resolution below 10 x 15 ( 4x6") - 1226 x 1852 15 x 20cm (6x8") - 1852 x 2428 Frame must be XXX.png ( transparent background ) Please read exact specification PNG_layouts_easyprint_en.pdf Simply,
download samples of prepared frames and modify / rename them for your needs
: 2/ Save your frame to USB flash - the frame ( called test.png ) must be saved in the directory as shown on the picture
3/
Import your frame to EASY PRINT APP
see.
pictures
|
||||
 Return to initial menu with the Close button (3x) and release the computer by pressing START SERVICE Setting with specific portrait frame is finished - all photos will be printed with your frame since now How to customize your Event.pdf |
||||
|
|
||||
| HASHTAG APP registration / activation / setting | ||||
|
|
||||
|
You need to connect Smart D90EV to internet to enable Hashtag APP to search for images on the social networks ( Twitter / Instagram) and you have to configure Hashatg APP 1 / Connect the Smart D90EV to the internet - via WIFI or LAN cable ( please read the link ) Hastag_activation_setup_en.pdf 2 / Activate ( enable) Hashtag service - see pictures Stop the program first again = press STOP SERVICE Then open - Additional Setting / Hashtag Service - check in the checkbox Service enabled and confirm by pressing SET  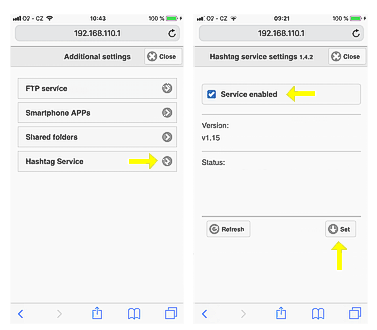 |
||||
|
3 / Create the account and register your license at
https//www.mecloudprinter.com
when you purchase the printer, you have free 14-day license Open https//www.mecloudprinter.com on your interent computer and press Create a new user account , fill in the required datas  Press Activate or extend a Hashtag licence , insert license code in the New Licence key and confirm required datas  If everything is OK, you see the new Hashtag Console menu  |
||||
|
4/ Configure Hashtag APP
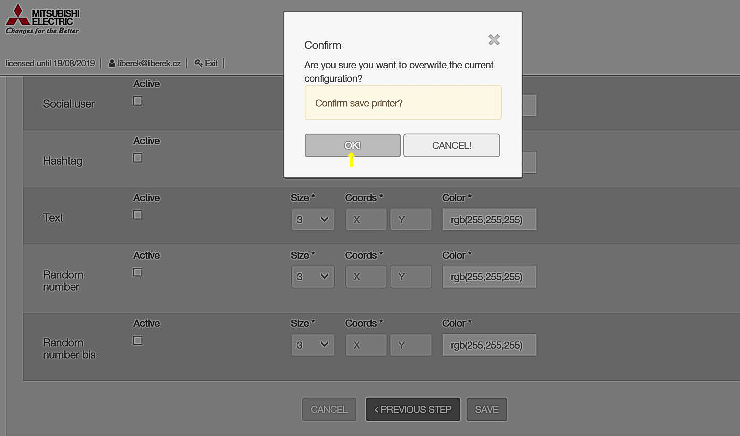
specifically for you Open the Hashtag Console where you can see how long your license is valid licensed unti X / X / 20XX Press ADD ( Event) Open Hashtag Console ( ADD printer - System ID is required = this ID is visible on first / START administration menu )  Fill in the required datas Printer Name / Location / your specific Hashtag (our example #testliberek) and check in the checkbox social network you intend to use ( one or both ) press NEXT STEP  Press button Browse and load your specific frame / logo and press SAVE ( button SAVE is visible on the next picture ) 
Confirm configuration
OK |
||||
|
|
||||
| Specifications | ||||
| Printer |
Detailed description of
the printer CP-D90DW-P see link : CP-D90DW-P |
|||
|
Print sizes / printing speed excluding data transfer time |
format 10x15 152x102 mm / HIGH SPEED 7,8 sec HIGH QUALITY 16.8 sec format 13x18 127x178 mm / HIGH SPEED 13,2 sec HIGH QUALITY 28,8 sec format 15x20 152x203 mm / HIGH SPEED 14,6 sec HIGH QUALITY 32,2 sec format 15x20 152x203 mm / HIGH SPEED 16,2 sec HIGH QUALITY 35,8 sec AUTO MODE - light images are printer in mode / HIGH SPEED dark images are printed slower in mode HIGH QUALITY |
|||
| Computer | Intel NUC / 1TB HDD / memory 2GB / OS Linux | |||
| Inerfaces | 4 x USB 2.0 ( 1 x USB is reserved for connection with printer ), VGA, HDMI, Ethernet / LAN, WIFI | |||
| Operat. conditions | temperature 5 to + 400 C, rel. humidity 30%-80% (without condensation), flat surface +- 50 to the horizontal | |||
| Power requirements | 100-240V AC 50/60Hz, 5.5 A during printing | |||
| Dimensions (WxHxD) | 275 x 298 ( height ) x 365mm | |||
| Weight | 18 kg | |||
| Color | black | |||
| Accessories | please see description above + accessory of printer ( power cable, User Manual, Ink sheet cassette, paper flanges, paper strip bin, paper catcher, spacer, CD with the drivers WIN 7 / 8 / 10 (32 + 64 bit) / Quick setup guide, cable fixation set ) | |||
| SMART D90EV | 1.399,6 EUR Export price without VAT | |||
| Optional software ( 14 days free trial mode ) | ||||
| Hashtag 30 | 69 EUR 30 days license | |||
| Hashtag 180 | 99 EUR 180 days license | |||
| Hashtag 365 | 169 EUR 365 days license | |||
| Optional HW | ||||
| Trolley Bag | 148, 80 EUR Export price without VAT | |||
| PARTY BOX | 94,40 EUR Export price without VAT | |||
| PARTY STAND | 248 EUR Export price without VAT | |||
| Consumables | ||||
| CK - D90DW-P | Consumables price-list | |||
|
DOWNLOAD Guides |
Manuals - videos | |||
|
DOWNLOAD Upgrades |
Please keep
your system updated
Software upgrades |
|||
|
DOWNLOAD Manuals / brochures |
|
|||
|
Brochure
Brochure_2 Hashtag_brochure |
||||
|
User Manual
|
||||


